SSH the Raspberry Pi Zero over USB
Pissh
In this post, we will see how to SSH a Raspberry Pi Zero over USB from a Ubuntu-based host. Moreover we will make sure the the Pi Zero has access to internet through the host so that we can install/update some software.
Install Raspbian
There exists plenty of tutorials on the topic of installing Raspbian (see the the official documentation) therefore I will not detail it here. To summarize, you have to,
Download
Raspian(Lite for headless)Burn the image on a micro SD card with
EtcherBefore unplugging the card we will enable SSH connections. To do so, open the
bootpartition on the card and simply create an emptysshfile:cd /path/to/root/ touch sshPlug the card on the Pi Zero
SSH over USB
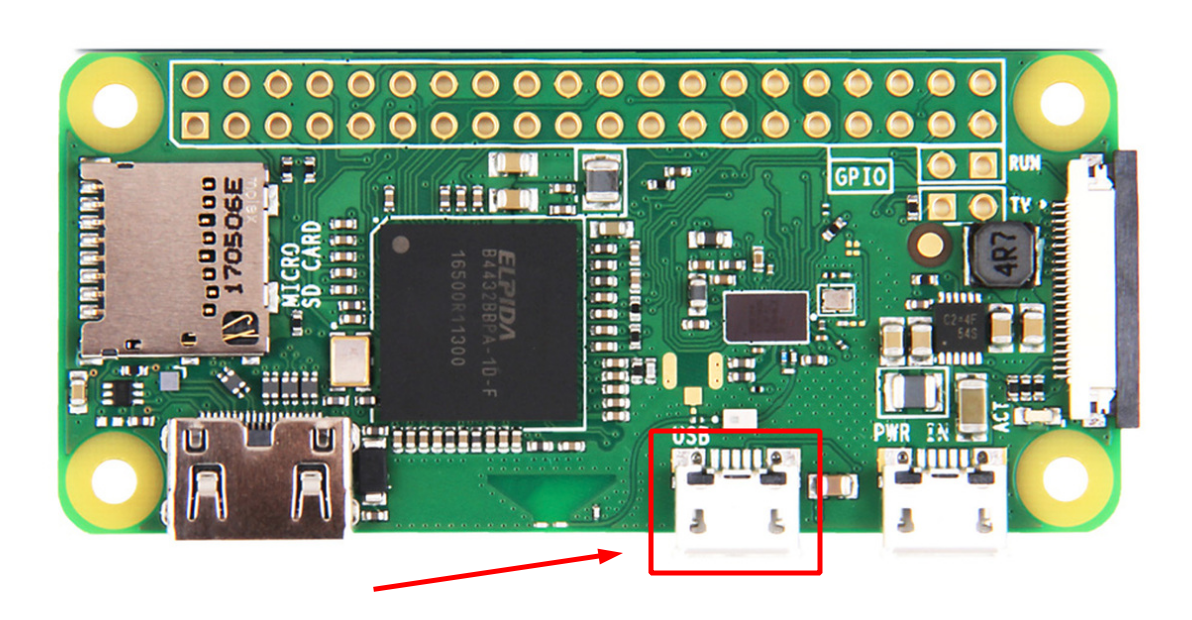
With the micro SD card ready we can now plug the USB cable to our host and Pi Zero. However, note that while the Pi Zero has two micro USB port, only one supports USB On-The-Go (OTG). It is this feature that will allows us to treat the connection as an Ethernet connection. The port in question is the innermost one, the one closer to the center of the board, as shown in the image below.
Set USB Gadget mode
We would like to be able to access the Pi Zero through SSH from our machine using a USB cable. To do that we will have to edit two files.
First, edit the file /boot/config.txt and append this line at the end:
dtoverlay=dwc2
Second, we will edit the file /boot/cmdline.txt.
After rootwait, we will add
modules-load=dwc2,g_ether
⚠️ pay attention to leave only one space between
rootwaitand the new text otherwise it might not be parsed correctly.
Note that there might already be some text after rootwait
in which case you still must add the following immediately after rootwait!
Again, leave a single space after rootwait but also after g_ether.
The Pi Zero is fully configured, we can now configure our host.
Set the connection to Shared with other computers
On your Linux host, go to the network connections editor. In the ‘IPv4 Settings’ tab, set ‘Method:’ to ‘Shared with other computers’. Refresh the connection (dis/connect), after what you should be able to SSH to the Pi Zero.
To SSH to the Pi Zero, open a terminal on your host and type:
ssh pi@rasberrypi.local
You will be prompted for a password, use the default one for user ‘pi’. And do not forget to change it down the line!
We are now connected on our board, let’s try internet out. Since we are using the method ‘Shared with other computers’ we should be able to access internet:
$ ping -c 3 www.google.com
PING www.google.com (172.217.13.100) 56(84) bytes of data.
64 bytes from yul02s04-in-f4.1e100.net (172.217.13.100): icmp_seq=1 ttl=57 time=10.7 ms
64 bytes from yul02s04-in-f4.1e100.net (172.217.13.100): icmp_seq=2 ttl=57 time=9.60 ms
64 bytes from yul02s04-in-f4.1e100.net (172.217.13.100): icmp_seq=3 ttl=57 time=10.4 ms

--- www.google.com ping statistics ---
3 packets transmitted, 3 received, 0% packet loss, time 2001ms
rtt min/avg/max/mdev = 9.609/10.276/10.783/0.499 ms
We are live!
Note: On some distro, the ‘Shared with other computers’ is not available from the default settings. In this case fire up
nm-connection-editorfrom a terminal instead of the network connections editor.
Set a static MAC address
Because we are connecting our Pi Zero as an Ethernet device through USB OTG, each time the connection is established the board is issued with a new random MAC address. This can be quickly annoying if we rely on the MAC address for, e.g. assigning a static IP to our board directly in our router configurations. This set up it totally optional.
In the boot partition, edit the file cmdline.txt and append at the end,
g_ether.host_addr=aa:bb:cc:dd:ee:ff
where aa:bb:cc:dd:ee:ff will be the static MAC address.
We can use for instance the last mac address assigned to the board.
To retrieve it, run ifconfig on the host machine and look for a
connection along the lines enp0s29xxxxx.
Set a static IP address
We can also choose to assign a static IP address to our board so that we don’t
have to look for it every now and then.
To set a static IP address, edit the file /etc/dhcpcd.conf as follows,
interface usb0
static ip_address=10.42.0.42
static routers=10.42.0.1
Where 10.42.0.42 is your desired static IP address.
Reboot and have fun!